Deployment Wizard
Summary
This document covers deployment considerations and the use of the Qarbine Deployment Wizard. The interaction through the steps using an SSH console and client web browser are covered. Primary and optionally secondary supporting Qarbine compute nodes may be deployed depending on the Qarbine feature level and license.
Overview
Qarbine is an analysis and reporting suite built for interacting with modern data and diverse cloud services. It is licensed as a VM which the customer deploys into their VPC. An account with AWS or Azure is required. The time to go through the documentation and perform the deployment is around 15 minutes. The person deploying must have public cloud skills and experience for launching VMs, configuring their network access, and connecting to their desired databases. Details and links to further information are provided below.
Qarbine deployment support can be found through support@qarbine.com. Additional services such as premier support, training, component development and such can be found by contacting support@qarbine.com as well. See the Help tab on all Qarbine application pages or http://doc.qarbine.com/docs/supportHelp for other information requirements.
Marketplace Starting Points
Qarbine is licensed from cloud marketplaces as a VM which you deploy into your VPC. Unlike traditional SaaS specific offerings, you can keep your data completely inside your VPC. As a result, Qarbine, the company, naturally has no visibility of your data. You run Qarbine, the software, as you deem appropriate to your environment following best practices and your organization’s IT policies.
Click on a link below to review the currently available marketplace listings.
| Marketplace | Offering | Location |
|---|---|---|
| Azure | Professional Edition | https://azuremarketplace.microsoft.com/en-us/marketplace/apps/qarbine1618349238434.qarbine-pro?tab=Overview |
| AWS | Professional Edition | https://aws.amazon.com/marketplace/pp/prodview-ygekqdlmuoepy |
General Qarbine information can be found through https://qarbine.com.
Getting Started
The Qarbine Deployment Wizard as described here must be run after the VM instance is first launched. It is used to configure the primary Qarbine host’s features and SSL settings. The base Qarbine virtual machine includes an Apache server, an internal database server, and various Qarbine endpoint services. The primary host maintains the configuration and the Qarbine component catalog.
Depending on your Qarbine edition, several hosts may participate in an overall Qarbine deployment to distribute running queries and template analyses plus reduce latency because of proximity to data. These secondary nodes need not be homogeneous from a public cloud vendor standpoint. Network accessibility with appropriate control policies is required of course.
Prerequisites
For general deployment instructions see the “Deployment Considerations” document.
For deploying a Qarbine on AWS see the “AWS Deployment” document.
For deploying a Qarbine on Azure, see the “Azure Deployment” document.
Confirm your network access rules prior to running the deployment wizard. The primary host must be accessible to the end user browser’s DNS and the Qarbine service (4000 is the default) must be accessible.
Just After Initial VM Launching
At this point you should have a running VM with a public IP. The next step is to decide on a public DNS approach for web browsers to access your Qarbine instance. Qarbine’s host instance is best run with a valid DNS entry rather than a self-signed certificate. The latter results in lots of web browser confirmations for example. The Apache server relies on this name value as well.
If you do not have an available DNS entry available then consider using a service such as the free noip.com service. It is quite easy to use. Instructions for signing up and registering are in “Using noip.com as a DNS Service”.
Also, Let’s Encrypt, a free SSL certificate service, will not create an SSL certificate for an AWS EC2 instance name. You can use your own certificates or have the Deployment Wizard create Let’s Encrypt ones with a non-AWS DNS host name which you determine.
If you are upgrading your Qarbine instance then decide on the temporary DNS host name and set its associated DNS record. This is done so that you can verify the new Qarbine host’s operation independent of your currently running Qarbine installation.
Next, confirm the following:
- a public IP address maps to a DNS entry (an AWS elastic IP, Azure Static IP, or equivalent is recommended),
- port 4000 is open for Qarbine service access,
- port 443 is open for web browser access (In general, Qarbine uses HTTPS),
- port 80 is open for web browser access (if you are going to use Let’s Encrypt then this port is used during the challenge\response interaction).
On your laptop compute run
ping YOUR_HOST_NAME
Verify that the public IP resolves to the one you are expecting. This is very important. The ping request timing out is normal. Receiving no response from the ping command is OK as well. Simply control-C to abort. The important check being done here is the DNS name and IP resolution.
Useful Utilities
There are several useful utilities in the ˜/qarbine.service folder.
| Utility | Description |
|---|---|
| dumpLocation.sh | Dumps information about the instance including any initial default password. |
| whatsMyIp.sh | Provides information on your public IP address. |
| gettingStarted.sh | Displays suggestions for accessing various information. |
| dumpCertificateSubject.sh | Displays certificate information. Use this once Qarbine is deployed to review the certificate status. |
Starting the Deployment Wizard Service
SSH into your host. Use your DNS name to double check the DNS mapping has been set properly.
For Azure, the initial hostname of a new Azure VM is the same as its name. For AWS the initial name is “ip-<address>”. Either way, it is highly recommended to set the host name to a valid DNS one.
Navigate into the home folder and adjust your host name by running the following commands
cd ~/qarbine.service
./setHostName.sh YOUR_HOST_NAME
Verify the DNS name to IP resolution from the VM as well via
ping YOUR_HOST_NAME
Receiving no response from the ping command is OK. Simply control-C to abort. The important check being done here is the DNS name and IP resolution.
Note- If you need to change the host name just after running the deployment wizard and prior to performing the deployment then control-C the wizard, run ./stopApache.sh, and then rerun the wizard. Apache will then be started using the newer host name.
Once the host name is set and DNS verified run
./deploymentWizardService.sh
This shell script verifies Apache and the internal Qarbine database are running and then starts the deployment wizard.
Wait a few moments. You should then see output indicating the service is running.
starting deployment wizard
Please wait. This may take a minute…
privateIp 172.31.82.248
DeploymentWizardService listening on port 4000
host name YOUR_HOST_NAME
maxFeatureLevel #
Open up a web browser to http://yourHostName/app/deploymentWizard.html
If your DNS entry has been setup then the following should work:
  http://YOUR_HOST_NAME/app/deploymentWizard.html
Be sure to wait for the last line above to appear.
If a previous process was launched, then you may terminate it via
kill -9 $(lsof -t -i:4000)
and then run the service command above again. If port 4000 is still not available then you can run ‘pm2 stop all’ and then run the service command above again.
It is important that once started, leave the shell open. If you are using putty, then make sure the connection stays alive via

NOTE- If a different port than 4000 is to be used, then edit the deploymentWizard.env file with the new port number. That number also ripples through your network access rules and many other Qarbine configuration settings. It's highly recommended to use the standard port!
Accessing the Wizard in the Browser
Opening the Wizard
Open a browser.
Be sure to clear the browser cache. For example, in the Chrome browser go to
chrome://settings and search for ‘cache’
Navigate using HTTP, not HTTPS, to your instance
http://YOUR_HOST_NAME/app/deploymentWizard.html
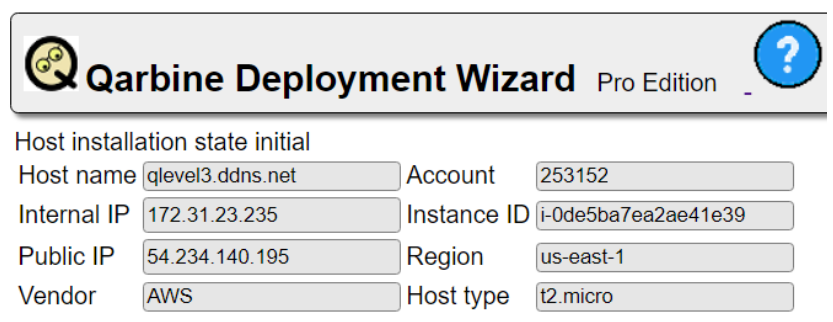
If things started property, the top left portion of the page shows information about your instance.
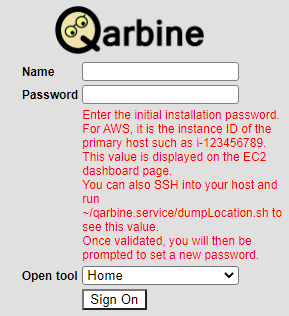
If you see the entry fields all empty such as this
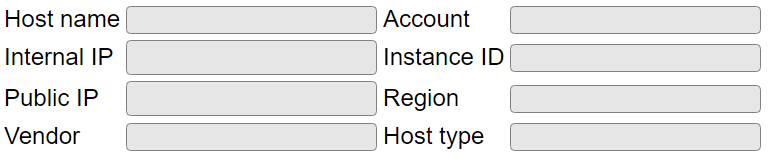
Then the browser developer console likely has a message about not being able to connect to the deployment wizard. Verify it is running by reviewing the SSH console. In addition, cross reference the port shown in the SSH console with that shown in the web console and also with your network security policy settings.
The “Host name” value should be the one you set above. Confirm the “Public IP” address is the expected one. You can run a ping from your local computer to review the DNS name resolution.
Possible Startup Issues
If no web page appears, then confirm the DNS resolution maps to your VM’s public IP address.
ping YOUR_HOST_NAME
If the IP address does not match this instance’s public IP address then check your DNS provider’s settings. You may want to clear your local DNS cache as well. For windows run “ipconfig /flushdns”. For Linux you may be able to run “sudo /etc/init.d/nscd restart” or with systemd “systemd-resolve --flush-caches”. If the DNS record was recently changed then the update may not have propagated out to the DNS server being used.
If no web page appears, then confirm Apache is running in the console via
sudo systemctl status httpd
If Apache is not active then run
~/qarbine.service/startApache.sh
If in the browser you see an unable to load the page and the address area has the host name format such as
then the Chrome browser’s Developer tool’s Network tab may provide information on the reason why. For example, a DNS reply stating the name was moved. Flush your local DNS cache. On Linux use “sudo systemctl is-active systemd-resolved“ and on WIndows use “ipconfig /flushdns”. Next, refresh the page.
If you see “Unable to get deployment state from XXX. Reply was error” or if there is no host name filled in then verify the deployment wizard service is running and then reload the page.
If you see “Unable to get deployment state from…” then make sure the deployment wizard service is running in your SSH console and your network rules are valid for ports 22, 80, 443, and 4000.
Another area to review is the port policy in use by the VM. Ports 22, 80, 443 and 4000 should all be open to some degree. The latter is the default Qarbine endpoint port. For AWS and Azure this would be in the Network Security Group area.
Once the deployment has taken place then another useful source of understanding Qarbine operations is the Qarbine log file. These can be found in ˜/.pm2/logs folder. The “main-out.log” file is a likely source of useful information. The log files are also accessible from the Administration Tool’s “Log Files'' tab.
If the DNS name is incorrect then determine the desired one and then
- In your SSH console control-C the deploymentWizard
- The run
./setHostName.sh YOUR_HOST_NAME
./stopApache.sh
./startApache.sh
./deploymentWizardService.sh
- Then refresh the browser page.
Choosing the Type of Deployment
The middle area of the page is where you select the type of installation.

The bottom portion includes a short explanation of the runtime environment.
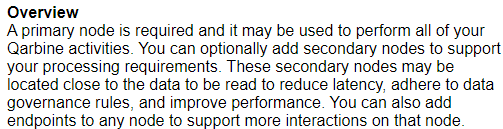
If this is your first Qarbine installation, then the following type of deployment is relevant.

The gray and orange bars depict network access paths to configure with different rules.
The right hand side of the page displays prompt fields for your selection. It has several items which vary by type of installation:
- endpoint properties,
- plugins,
- drivers,
- SSL certificate, and
- default data service.
If you are cloning a primary node, or upgrading Qarbine, then scroll down to the Updating and Upgrading section below.
If you are installing a secondary node then scroll down to the Installing Secondary Hosts section below. The availability of this feature is dependent on Qarbine edition, release and other factors.
Installing the Primary Host
Every Qarbine installation requires a primary host node. Once there is a primary node, you may license other compute nodes known as secondary nodes as part of your overall Qarbine deployment. Secondary node deployment is discussed in the section below. For a primary node deployment choose the first option.

Note that secondary node support is not available in the Professional edition.
After installation when you first log on you will be prompted to change the password.
NOTE- For AWS installations the initial password is the instance ID. For other installations it is ‘changeMe’. If you are on AWS then you may want to copy it now for use in a few minutes. If you forget the instance ID, then in the SSH console within ~/qarbine.service, run ./dumpLocation.sh to see the instance ID value. It is also shown in the console as the deployment service exits.
Set the Basic Properties
The default properties can usually be left as-is. Confirm the DNS name field matches your host’s DNS name.

Verify the service port specified is open for end user web browsers.
Setup SSL Certificates
SSL certificates support the encrypted communications across web browsers and Qarbine nodes. Indicate what SSL certificate usage you want to use on this host.
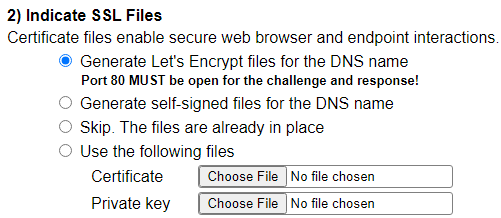
For Let’s Encrypt, port 80 must be OPEN to the world for the challenge and response protocol to be successful. After deployment, this interaction is done periodically to maintain the certificate as well. Let’s Encrypt also limits the number of new certificate requests for a particular DNS name to 5 requests within 168 hours (7 days). You would run into this limit if you are repeatedly deploying to the same DNS name. To avoid this you can copy off an already deployed instance the generated qarbine.crt and qarbine.key files in `˜/qarbine.service/config and later choose the “Use the following files” option to reuse them. When the limit is reach the error message you will see in the deploymentWizardService console is,
There were too many requests of a given type :: Error creating new order :: too many certificates (5) already issued for this exact set of domains in the last 168 hours: yourHostName, retry after 2024-09-14T10:11:14Z: see https://letsencrypt.org/docs/duplicate-certificate-limit/,
Please see the logfiles in /var/log/letsencrypt for more details.,
The self-signed certificate option is NOT recommended as most browsers will complain in many ways about their usage. Additional information
You can choose the “Skip.” option if the certificate files for Apache and Qarbine services are already in place because you have manually copied them to the host. This must be done PRIOR to doing deployment. The Apache files are referenced within qarbineCustomVariables* files in the /etc/sysconfig folder on AWS or in /etc/apache2 on Azure. The Qarbine ones are referenced by env.common.txt in the ˜/qarbine.service/config folder. The default file names are qarbine.crt and qarbine.key. The qarbine.both file has these 2 files concatenated.
If you already have matching certificates then specify them by clicking on each of the “Choose File” buttons. Be sure the internal names match the host name!
If using Let’s Encrypt, then the certificate is generated into
and the private key are generated into
/etc/letsencrypt/live/HOST/privkey.pem
Specify Plugins and Drivers
Next indicate which plugins are to be active for this endpoint. Several plugins are only permitted on the main endpoint. In addition, a few are required on all endpoints. These options can be adjusted later using the Qarbine Administration Tool. The list of plugins and drivers will vary based on the Qarbine feature level.
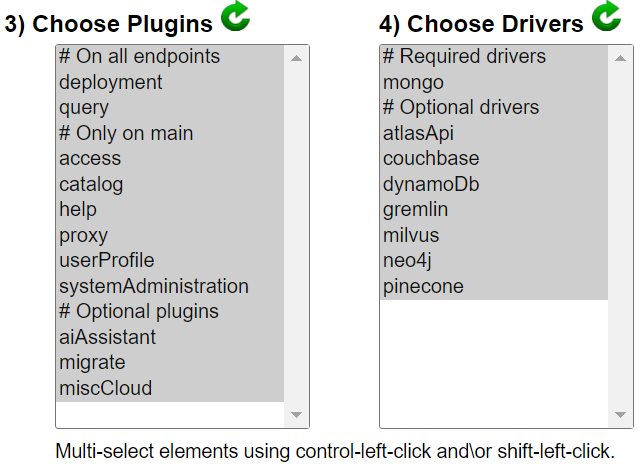
Next, indicate which data integration drivers are to be active for this endpoint. The MongoDB driver is required on all endpoints for internal logging purposes. A driver may also be active but not in use by a Qarbine Data Service. Any active Data Service must have a corresponding active driver on the associated Qarbine compute node.
Note- You can add and remove plugins and drivers after initial deployment by directly changing the service.NAME.json file’s content in the ˜/qarbine.service/config folder.
Optionally Set a Default Data Service
On the right hand side you can optionally specify your default Qarbine Data Service at this time. This can easily be added later using the Qarbine Administration Tool.

Enter the server template.
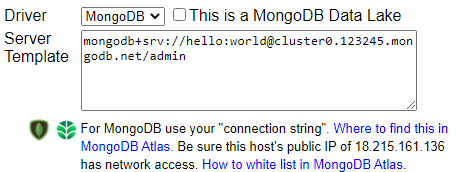
If desired, specify the default database.

Be sure to validate that the primary host has access to the data server above by clicking the Test button. Desired output is shown below.

An error may occur from invalid account credentials, invalid domain name, or lack of network accessibility. A sample error is shown below.

Apply the Options
When you are done setting the above values, locate the button shown below.

Click the button and an in process message will be shown.

If all goes well the following message will appear

A dialog will appear
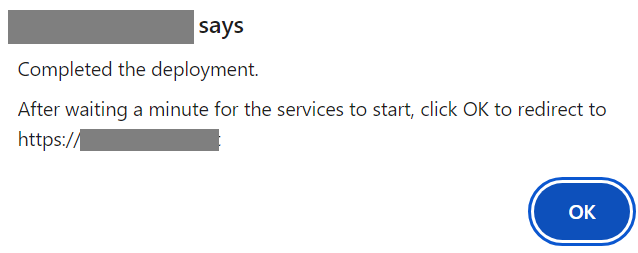
After waiting at least a minute and clicking OK, the Qarbine sign on page should soon appear.
If not then wait a minute more and reload the following URL
https://yourHostName/app/signOn.html
Back in the SSH console , review the output. If you chose Let’s Encrypt certificates then pay careful attention to any repeated certificate request errors. See the troubleshooting section below (point 7).
Some output will appear as the deployment service exits.
generateDeploymentConfiguration
doWhat createPrimary
createFiles main createPrimary
. . .
instance ID i-1234567890abcdef
Stopping our deployment process...

Wait a minute to allow services to startup for the first time.
After that, you may log on to your primary Qarbine node.

Open up a web browser to https://yourHostName/app/signOn.html.

The high level Qarbine Bucket List Tour document is at
   https://qarbine.com/bucketListTour.html

Also, once signed on you can refer to the Help tab toward the top of each
Qarbine tool page for useful information topics and links.

You can check your instance information by running ./dumpLocation.sh
The last line of the output will show the initial password.

The administrator user name is q_admin.
The initial q_admin password for AWS is the AWS instanceId i-1234567890abcdef
If you end up closing the shell too early or forget the initial password then open another SSH shell and run
./dumpLocation.sh
For AWS you will see the initial password information to use in Qarbine sign on page. You can copy it from the SSH console output.
The initial q_admin password for AWS is the AWS instanceId i-1234567890abcdef
For Azure environments the initial password is “ changeMe ”.
To see the instance information again later, you can run ‘˜/qarbine.service/dumpLocation.sh’. Sample output is shown below.
{
  vendor: 'AWS',
  region: 'us-east-1',
  instanceType: 't2.micro',
  defaultAccount: 'ec2-user',
  accountId: '123456789',
  instanceId: 'i-1234567890abcdef,
  imageId: 'ami-062a3c583d1715999'
}
Run “pm2 list” to check on the status. Soon the main process will be started as shown below.

If the “main” entry is not listed, then run the following to define it
pm2 start config/service.main.json
Run the “pm2 list” command again and it should now appear.
First Time Sign On
NOTE- For AWS installations the initial password is the instance ID (see above). For other installations it is ‘changeMe’.
****
In early 2024 when using Let’s Encrypt certificates Chrome started reporting this in the address entry field area.

Click the red button to see in the dialog that the certificate is valid.
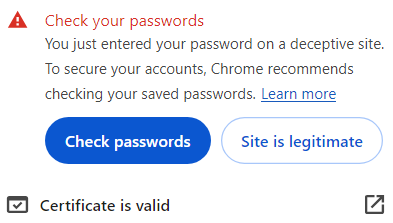
Click

The red button disappears.

Enter the user name of “ q_admin ” and the password in the form below.
If there are no options in the drop down then clear the browser cache and reload the page.
 Next, click

If successful, the bottom area will be updated as shown below. Enter your new password in the form.

Next, to change the password and access Qarbine click
If successful then the selected tool will be opened.

Waiting for the loading to complete.
The installed data service named “DynamoDB” is configured for a locally running server and referenced by sample Qarbine components. See the Qarbine DynamoDB Tutorial on http://doc.qarbine.com for information on setting up your own sample database.
Getting Instance Information
Within your SSH session you can get information about the instance via,
cd ~/qarbine.service
./dumpLocation.sh
Sample AWS output is shown below.
{
  vendor: 'AWS',
  region: 'us-east-1',
  instanceType: 't2.micro',
  defaultAccount: 'ec2-user',
  accountId: '253152774760',
  instanceId: 'i-0f7a9d6a3c26e7ea0',
  sku: null,
  imageId: 'ami-097eddee05944e45f'
}
{
  "osType": "Linux",
  "platform": "linux",
  "arch": "x64",
  "release": "5.10.96-90.460.amzn2.x86_64",
  "memory": 1012412416,
  "cpus": [
    {
      "model": "Intel(R) Xeon(R) CPU E5-2676 v3 @ 2.40GHz",
      "speed": 2399
    }
  ]
}
Sample Azure output is shown below.
{
  vendor: 'Azure',
  defaultAccount: 'azure-user',
  region: 'eastus',
  instanceType: 'Standard_B1s',
  accountId: 'a6f9d020-...',
  instanceId: 'f06313bb-...',
  instanceName: 'myQarbine-1.3.17',
  sku: '',
  plan: { name: '', product: '', publisher: '' }
}
{
  "osType": "Linux",
  "platform": "linux",
  "arch": "x64",
  "release": "6.8.0-1015-azure",
  "memory": 883728384,
  "cpus": [
    {
      "model": "Intel(R) Xeon(R) Platinum 8272CL CPU @ 2.60GHz",
      "speed": 2593
    }
  ]
}
Upgrading and Cloning Qarbine Hosts
Overview
Qarbine is delivered in various formats including virtual machines. The base Qarbine virtual machine includes an Apache server, an internal database server, and various Qarbine endpoint services. Each Qarbine VM is built for a specific feature level and to adhere to cloud vendor packaging policies. Upgrading from a standard to the premium feature level version requires a new Qarbine virtual machine. Updating to a newer software version does as well. The Deployment Wizard helps guide you through this process. All principal and database account passwords are maintained. This process includes copying the source installation’s env.main.txt file which includes the password secret, JWT secret, and various other settings.
Preparation
If you are upgrading then for preparation, decide on the temporary DNS host name and set its associated DNS record. This is done so that you can verify the new Qarbine host’s operation independent of your currently running Qarbine installation. Later on, once satisfied, you can
- Copy your SSL certificates to the new host’s Apache and Qarbine runtime folders.
- Update the new host name to match your Qarbine production host name.
- Update your DNS record or an elasticIP association for the new host’s IP address.
Application clients may need to have DNS caches cleared to properly reach the new host. Preferably an elastic IP address is used which makes the switchover easier.
To see which Qarbine version is installed on a host SSH into the host, and run
more ~/qarbine.service/version.env
Setting the Installation Properties
Choose the option shown below

Use this option when changing your Qarbine feature level or you want to clone an installation. If the source primary node is using a local Qarbine catalog database then data will be copied to the new host’s database. The Qarbine database accounts and principals are duplicated to the new installation’s database. This is a point in time copy. Later you can import updates from the source installation to synchronize again as needed.
When the source primary node is using a MongoDB Atlas or Extended Edition instance no copying is needed. The new installation refers to the same database as the source.
Fill in the fields in a similar manner as for a secondary node.
In “1) Set Cloned Primary Properties“ double check your host name.
In “2) Indicate SSL Files” choose your SSL certificate option. It is a temporary name for use during verification.
In “5) Specify Existing Primary Node Access” fill in the source primary domain and port.

Click

The output should be something like that shown below.

Next enter an admin account on the source primary node.

Click

The output should be something like that shown below.

When you click the Verify button the source primary’s plugins and drivers will automatically be selected within their respective lists.
Click

The output should be something like that shown below.

When you are done setting the various properties, locate the button below.

Click

If all goes well a brief message will appear and you will be redirected to the sign on page.
Post Deployment Steps
Overview
Verify the new host independent of your currently running Qarbine installation.
Synchronizing Catalog Content
Qarbine users using the original deployment may update components between the initial new deployment and the end of its verification timespan. Once the new installation is verified you likely want to import updated components to this new environment to roll forward changes into this environment. To do this open the Administration tool and navigate to the tab shown below.

Make the selection shown below

Choose the action

Fill in the parameters for your production deployment.

Note that port 37000 for the internal database MUST be open on the current production host for this new host so that the catalog can be accessed. Consider doing this only on a temporary basis during the import activity or over the verification time frame. In a multi-host Qarbine deployment the secondary nodes always need access to the primary database as well.
Click

Wait for the matching remote components to be imported.
Feedback will be presented on the results.
Note that production changes such as data services, principals, and other values are not copied over in this process. Only catalog content is copied over. On the production host this information can be exported into several JSON files using the option noted below

Align with the option noted below.

The individual JSON files can be imported using the mongoimport utility. For more information see https://www.mongodb.com/docs/database-tools/mongoimport/. The general command line syntax is
mongoimport <options> <connection-string> <file>
A sample command line for Data Services is shown below
mongoimport --db q_config --collection DataService --file DataService.json --jsonArray …
Switching Over
These steps are for when you are replacing a Qarbine deployment with an upgraded one and are using the same DNS entries. Once the new deployment is verified you can
- Copy your SSL certificates to the new host’s Apache and Qarbine runtime folders
- Update the new host name to match your Qarbine production hostname
- Update your DNS record or an elasticIP association for the new hosts’s IP address
- Reboot the new host
If a new DNS IP is being used then application clients may need to have DNS caches cleared to properly reach the new host. DNS TTL settings may also need consideration. Preferably an elastic IP address or equivalent is used which makes the switch over much easier.
Sign on to the soon to be ‘OLD’ Qarbine deployment to the Administration tool.
Click the tab highlighted below.

Select the option shown below.

Choose the entry highlighted below.

Click

The qarbine.crt and qarbine.key files are contained in the downloaded zip file. The entries are
- config/qarbine.crt
- config/qarbine.key
Stop the instance.
Sign on to the soon to be ‘NEW’ Qarbine deployment to the Administration tool.

Click the tab highlighted below.
Select the option shown below.
Click the button

Navigate to the downloaded certificate zip file and choose it. THe name is filled into the widget.
To upload click

The contents of the zip file are shown for feedback.

SSH into the soon to be “NEW” Qarbine deployment:
cd ~/qarbine.service
Back your current certificates which reference the soon to be old name.
cp ./config/qarbine.crt ./config/qarbine.crt.oldName
cp  ./config/qarbine.key ./config/qarbine.key.oldName
Unzip the uploaded zip file containing the certificates.
unzip qarbinated.ddns.net-certificateFiles.zip
Respond to the prompts as shown below.
Archive:  qarbinated.ddns.net-certificateFiles.zip
replace config/qarbine.crt? [y]es, [n]o, [A]ll, [N]one, [r]ename: y
  inflating: config/qarbine.crt
replace config/qarbine.key? [y]es, [n]o, [A]ll, [N]one, [r]ename: y
  inflating: config/qarbine.key.
Run the command to copy the certificate files to the locations used by Apache by running
./copyCertsToApache.sh
Confirm the host name references in the Qarbine service and Apache certificate files
./dumpCertificateInfo.sh | grep CN
Sample output is shown below
Issuer: C = US, O = Let's Encrypt, CN = R3
Subject: CN = qarbinated.ddns.net
Issuer: C = US, O = Let's Encrypt, CN = R3
Subject: CN = qarbinated.ddns.net
Use the Qarbine command script to adjust the host name to the new one. This script also synchronizes the WEB_HOST value used by Apache.
./setHostName.sh myHostName
The side effects of the above command are:
update the certificate file names in
/etc/sysconfig/qarbineCustomVariables
/etc/sysconfig/qarbineCustomVariablesCentOs
update the contents of any ./config/env.common.txt for the MAIN_COMPUTE_HOST.
Restart Apache and any internal MongoDB database services to use the new host name.
./restartOtherServices.sh
Wait about 10 seconds for the services to restart.
Start the Qarbine services.
pm2 start all
Adjust the public DNS entry for the new host’s IP address as appropriate. Depending on the DNS entry’s TTL setting it may take some time for the new IP to propagate.
In the SSH session on the new host you can check the DNS resolving by running
resolvectl flush-caches
ping qarbinated.ddns.net
On Windows you can flush your DNS cache and check the DNS resolving by running
ipconfig /flushdns
ping qarbinated.ddns.net
Wait for the above checks to be satisfied.
Sign on to Qarbine as before using the DNS name.
Troubleshooting
“Not yet configured”
If you see the following dialog just after installing

Then wait a minute, then click OK to give the server a bit more time to finish the installation.
No Sign On Page
SSH into the instance.
Run
The “main” service should be shown and running.
If it is not shown then run
If it is not running then run
If no web page is shown then run
./startApache.sh
AWS and Let’s Encrypt
For AWS if the host name has not been set and Let’s Encrypt is used, then the following error message will be shown,
Let's Encrypt will not create certificates for an EC2 host name. SSH into the host and change its name.
Deployment Wizard Opens HTTPS
If the very first time you run the deployment wizard you are directed to an HTTPS page then for AWS confirm the following file names in /etc/httpd/conf.d
redirect-port-443-deploymentWizard.conf
redirect-port-80-signOn.disabled
If they need renaming then
stop the deployment wizard with control-c
Run
./stopApache.sh
Perform the renaming and then run
./startApache.sh
./deploymentWizardService.sh
Browser Redirects to HTTPS
This situation can occur if you are reusing a DNS name and running the Chrome browser. This can be seen in the browser’s console within the Network tab. The interaction will show a “307 Internal redirect” interaction.
To clear 307 HSTS redirects in Google Chrome go to the following URL.
chrome://net-internals/#hsts
Enter the domain name in the field below and then click the button.

In Chrome’s URL entry field at the top, change the HTTPS to HTTP and reload the deployment wizard page.
Browser Shows “Not Secure”
Once the installation completes and the page is refreshed, the address bar shows

and the page shows

Click on 
Click on 
Review the dialog information


Compare the “Issued to” name with your host name. Also verify the valid date range.
You can manually copy the correct certificate files qarbine.crt and qarbine.key into ˜/qarbine.service/config folder. Then in the ˜/qarbine.service folder run
./copyCertsToApache.sh
./restartApache.sh
pm2 restart all
The Apache log files are in the /var/log/httpd folder.
You can view your certificate’s DNS name entry from the SSH shell using,
cd ~/qarbine.service
./certificateSubject.sh
Too Many Let’s Encrypt Requests
Let’s Encrypt limits the number of certificate creations over a time period for a given name. In the console this error appears as
There were too many requests of a given type ::
Error creating new order :: too many certificates (5) already issued for this exact set of domains in the last 168 hours: qtest3.ddns.net, retry after 2023-09-16T22:44:11Z:
You will need to use a different DNS name in the meantime. This condition does NOT manifest itself in the browser front end.
pm2 is not found
If the command is not found then add PM2 to your path by
Running
sudo vi /etc/profile.d/addYarnToPath.sh
Press the letter “eye” to go into insert mode.
Enter the following
export PATH=$PATH:~/.yarn/bin
Press the sequence “:w” <enter>.
Press the sequence “:q”
Odd Sign On Behavior
If you are asked to sign on for the first time after performing a secondary node deployment then clear the browser cache and refresh the page.
Secondary Node Does not Start
If a secondary node does not start up, then its relativeToMain value may be mis-configured. For example, env.onSecondaryHost.txt may have a value of ‘inside’, but the correct value is ‘outside’. A symptom of this is shown below from the ./pm2/logs/XXX-error.log file
 --> error connect ECONNREFUSED 172.31.89.157:4000
fetchJsonObjectFromUrl HTTPS://172.31.89.157:4000/dispatch?action=....
Remember that ports must be open for the primary node to reach the secondary node and vice versa. See the “Network accessPreparation” section above.
- After an installation the sign on may fail with the following message pattern in the console.

This may be caused by the host name used by Apache being incorrect. Review the contents of /etc/sysconfig/qarbineCustomVariables. An incorrect setting is shown below
export WEB_HOST=your.host.name
After editing then restart Apache via
sudo apachectl restart
Or as the standard user simply use
~/qarbine.service/startApache.sh
The Apache log files are located in /var/log/httpd.
- After deployment, the post deployment results in a dialog similar to the following

The browser’s entry field may also show

Verify the contents of ˜/qarbine.service/config/deploymentState.txt is
Verify the output of this command
~/qarbine.service/dumpCertificateInfo.sh | grep Subject:
matches your desired domain name
Subject: CN=your.host.name
If the above are correct then manually start the service
cd ~/qarbine.service
pm2 start main
and then navigate your browser to
https://yourHostName/app/signOn.html