MongoDB API
Prerequisites
This tutorial expects familiarity with MongoDB API querying fundamentals. Qarbine interacts with the MongoDB API in a native manner and fully supports the document data model. This enables direct access to the MongoDB database features ranging from the aggregation pipeline, to full text search (FTS), to AI driven vector search ($vectorSearch). Interaction with the database is from a connection string which enables you the flexibility to access data on real-time, secondary, or analytic nodes. Free MongoDB Atlas DBaaS instances can be deployed by visiting Getting Started with MongoDB Atlas at https://www.mongodb.com/lp/cloud/atlas/try4. There are also many querying tutorials available on the web and numerous learning resources at MongoDB University (https://learn.mongodb.com/).
Overview
This tutorial covers aspects of Qarbine and fundamental use of the general MongoDB querying language and answer set handling. MongoDB databases store data as JSON/BSON documents. Each document represents a record and can have varying fields. Documents can be nested to express hierarchical relationships and store structures like arrays. Querying from Qarbine uses the MongoDB Querying Language (MQL) and can use basic find() interactions or the more powerful aggregation pipeline interface. Qarbine passes the query along to the backend MongoDB connection string identified endpoint and accepts the answer set list of documents.
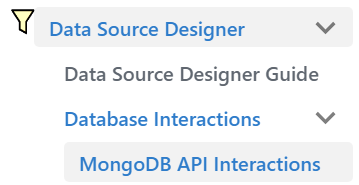
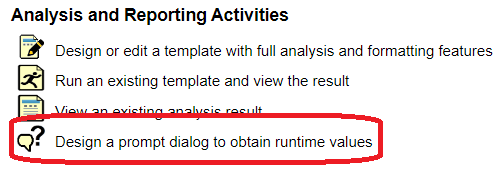
Further query interaction information can be found by navigating to the Tools tab

Then, selecting the categories shown below.
Defining a Data Source
Overview
A Data Source is a Qarbine component responsible for retrieving data. At a high level it has a name, a description and some arbitrary query string which when sent to the associated Qarbine Data Service endpoint returns some data. The overall execution flow for an analysis, including the optional prompt component, is shown below.

A single data source can be referenced by name from multiple Qarbine template components. This enables a single point of change when perhaps, an index is added, or some other query tweak is necessary. The alternative is to attempt to find all templates impacted by a schema or index change for example. The component reusability is especially beneficial when team members have varying roles and skills.
Opening the Tool
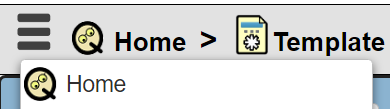
You can access the Data Source Designer in several ways. Tools can be opened from the signOn page, the home page, and from various tools using the hamburger  menu.
menu.
From the Home tool.

Alternatively you can open the tool from the hamburger menu on each tool.
. . .

Pressing the control key during the menu click opens the tool in another tab.
Note that pressing the control key while clicking this option opens the tool in another tab. This is a convenient way to have multiple Qarbine tabs open and quickly navigate between them.
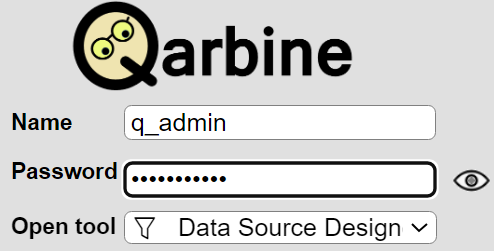
From the sign on page
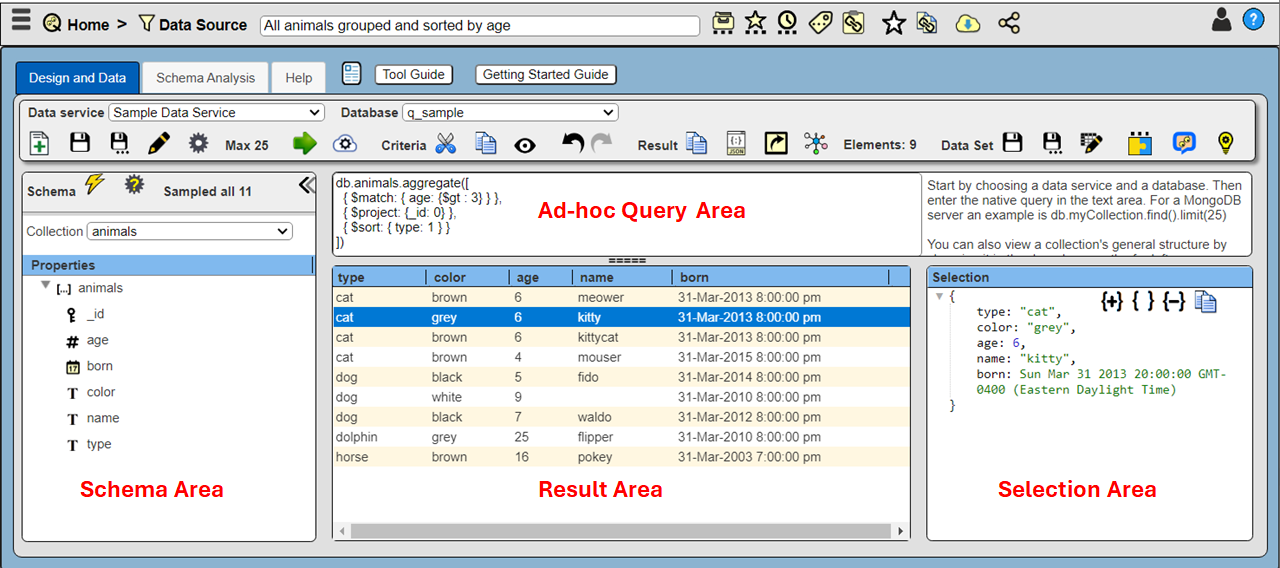
The core layout of the Data Source Designer is depicted below.
Query Language Options
The Qarbine driver for the MongoDB API permits either MongoDB Query Language or SQL queries. The latter is only supported when the endpoint is configured for MongoDB Atlas SQL. Qarbine previews the query to determine which underlying endpoint service query dialect to call.
Managing Answer Set Size
The default maximum number of rows starts off at 25 for a new data source. This is useful to evolve a query from a concept to one that you have verified returns the desired answer set. As noted, any native way of limiting an answer set size is the preferred approach. This setting is in the component dialog as shown below and also accessible by clicking the ‘Gear’ icon.
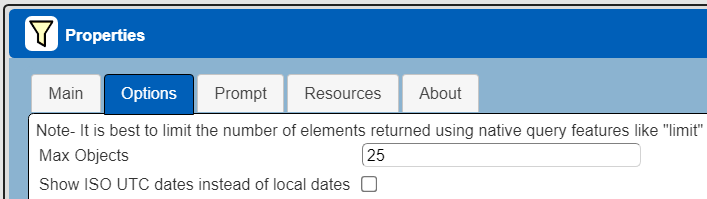
Once you are done drafting you can adjust this parameter. A “0” indicates there is no maximum. A number greater than 0 indicates to limit the final answer set size to that number of rows. This answer set truncation comes after any native query limit. So, if the answer set from the data endpoint is quite large, that content has to be returned to the Qarbine host. It then may truncate the number of rows. It is best to truncate at the query level (i.e., use a limit) to reduce the content sent from the data endpoint to the Qarbine host in the first place.
Example
In the tool the first thing to do is specify the data context. This is done by selecting the Qarbine data service in the drop down and then the database from the second drop down. The “Sample Data Service” is one defined as part of the standard installation. Qarbine administrator may choose to disable it as they please.

The top area is for entering the query criteria. The data source below retrieves a list of portfolios from the portfolio collection.
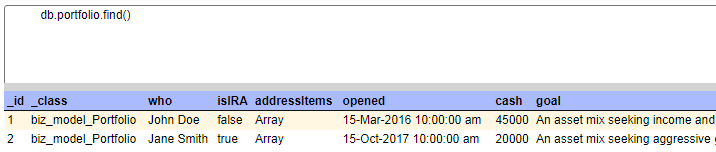
A sample result element is shown below. Notice the with embedded documents and arrays.

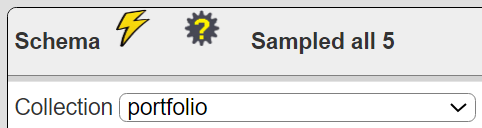
To see the general structure of a collection simply choose it from the left-hand drop down member as shown below. This is an approximate schema because of sampling and the flexibility of the MongoDB document model.
A data source component can be saved and reused by any number of templates. Other team members using the component do not need to become experts in the MongoDB Query Language or the underlying data schema.
Running the Query
Data sources can be made more flexible by using variables within their query. A Qarbine prompt component can be defined to prompt the user for the value. A new data source can be defined with the query
db.portfolio.find( {isIRA: @isIRABoolean} )
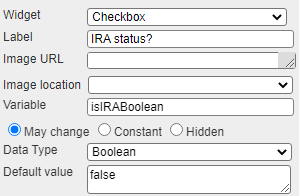
Since there is a variable reference (denoted by the ‘@’ prefix in ‘@isIRABoolean’) running this within the Data Source Designer presents a generic prompt as shown below.

The user can then set the data type to boolean and click the checkbox.

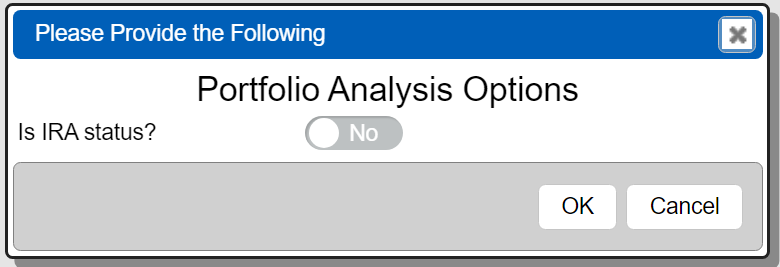
Click the OK button to continue. A sample result is shown below.

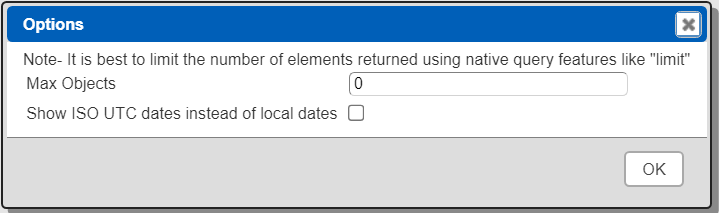
Adjusting the Maximum Rows
Recall the default maximum rows at the component level is 25. At this point you can change that setting by clicking.

Adjust the setting to “0” indicating no Qarbine answer set truncation.
Click

Saving Your Component
The component can be saved with the name “All portfolios for @isIRA”.
Click

Navigate to the target catalog folder within the dialog.
Fill in the name, description and other properties as desired.
Click

Prompt Integration
Overview
Qarbine prompts provide a way to obtain runtime values and variables for data source and template execution. To avoid hardcoding, prompts can use macro formulas to run queries which populate list widgets. Prompts are defined in a no code manner using the Prompt Designer. See that document for details on the powerful, no-code features of the Prompt Designer. Shown below is the execution flow when there is a Prompt component.

Opening the Tool
You can access the Prompt Designer in several ways. Tools can be opened from the signOn page, the home page, and from various tools using the hamburger menu.
From the Home tool.
Alternatively you can open the tool from the hamburger menu on each tool.


Pressing the control key during the menu click opens the tool in another tab.
Shown below is an example of a basic prompt.

Access the Prompt Designer. The prompt starts with no elements but will eventually have the following elements.

In the left hand area either double click  or drag and drop either into the elements table area. The first is a heading as defined below.

When changes are made to the prompt element the top area icon will be changed from

to

Update the element as shown above.
You have to exit out of any entry field for the change to be noticed. Click  to save the element and update the sample overall prompt to the right.
In the left hand area widgets either double click  or drag and drop either into the elements table area. Select the element. The second element uses a checkbox as defined below.
Update the element as shown above.
To test the prompt click

Interact with the dialog as desired.
Click OK to close the dialog.
The Prompt Designer changes tabs and shows the following

To save the prompt click

In the catalog prompt navigate to the target folder.
Name the prompt “Prompt for @isIRABoolean”.
Click the OK button.
Data sources, templates and other components can reference prompts to obtain runtime values. Much more complex prompts are possible. See the Prompt Designer Tool guide for details.
A data source or template can reference this prompt to obtain the isIRABoolean runtime variable value. For now, we’ll associate the data source with it. This is done within the Data Source Designer. Navigate to the Data Source Designer tool using one of the tool navigation options described above.
To access the data source’s properties dialog click

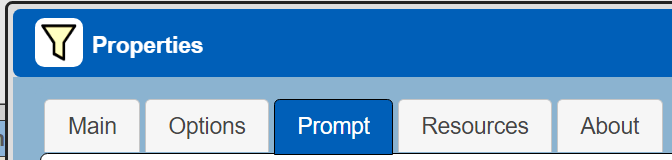
Within the properties dialog navigate to the Prompt tab as shown below.
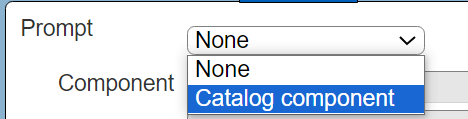
Click the option highlighted below
Click the recents button highlighted below.

Choose the just created prompt.

To close the Recents dialog click

The reference is filled into the Data Source Properties dialog.

Close the properties dialog by clicking
To save the Data Source in the catalog click

Running the data source now presents the prompt to obtain the variable value. Try it by clicking

The prompt dialog is presented.
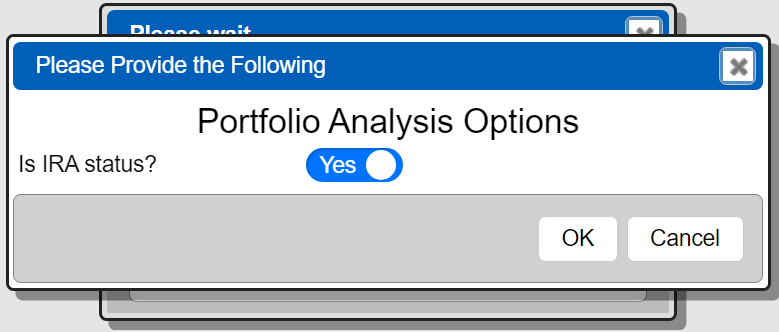
Make your selections and click the OK button. The runtime value propagates along the execution path, is placed into the query variable, and the query is run. The results are then shown in the tool.
Template Designer Use
General Interactions
To specify your templates Qarbine presents a grid of cells across lines belonging to various template sections. Similar to Excel, Qarbine formulas are defined by first clicking on the grid area and then typing into the formula entry field. The right hand side of the Template Designer shows the properties of the cell. There are ‘regular’ cells and ‘custom’ cells. The latter are for elements such as images and interactive buttons. Qarbine provides a large variety of custom cells for flexible presentation and interaction options.
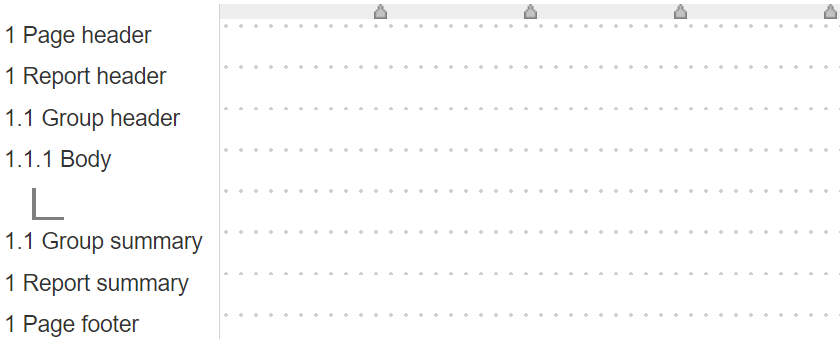
Layout Grid Paradigm
The Qarbine layout paradigm is similar to an outline with various levels. The template has a main data retrieval and one or more ‘body’ sections. The simplest layout would have a report header, a 1.1 group header, a 1.1.1 body, a 1.1. Group summary and a report summary sections. Sections can have multiple lines and, like cells, there are many options for controlling their processing and presentation. Below is a snapshot of the basic outline structure.
Data Handling
In the “hello world” case the main retrieval’s data elements are formatted within the 1.1.1 body.
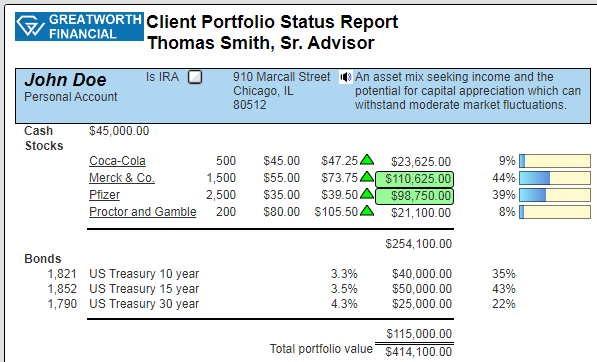
When the data to be processed has multiple lists (AKA embedded arrays) then multiple groups need to be defined. Groups provide the mechanism for iterating through lists. Groups can contain inner groups. In the stock portfolio example there is a main retrieval for the list of portfolios and each portfolio has a list of stocks. In this case the 1.1 group header would show general portfolio information and there would be a data retrieval defined for 1.1 group for the list of stocks. The stock details would be formatted within the 1.1.1 body.
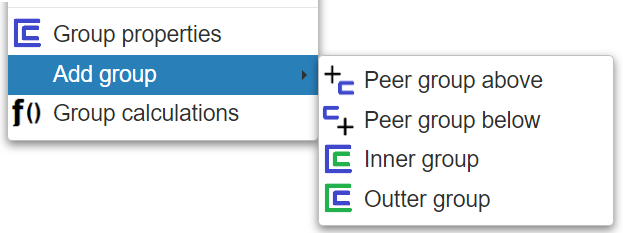
Many modern data structures also have multiple lists. In the sample portfolio data the list of stocks and the lists of bonds would be an example. Qarbine’s flexible analysis engine supports multiple peer groups. Groups are added by selecting any line in the group in the left hand side and right clicking for the popup menu.

The group options are toward the bottom of the popup menu.
Embedded document data is typically accessed using dot path notation. For example,
#profile.phone
Formulas
Cell formulas can reference field names using the ‘#’ prefix and formula results can be saved into variables. Here is a simple example,
set value = #price * #quantity
Excel generally uses arbitrary cell references like “F5 * F6” in cell formulas. Qarbine promotes the use of meaningful field names and variables. As a result, formulas are much easier to understand. To reference a variable in another formula use the ‘@’ prefix. For example,
set totalCost = @value * @taxRate
Formulas can be used in numerous areas including processing conditions, background colors, foreground colors and pagination rules. There are over 400 macro functions available in Qarbine. Simply click the ‘...’ button or control-E to access the formula builder dialog.
Defining an Analysis Template
Opening the Tool
You can access the Template Designer in several ways. Tools can be opened from the signOn page, the home page, and from various tools using the hamburger menu.
From the Home tool.

Alternatively you can open the tool from the hamburger menu on each tool.

. . .

Pressing the control key during the menu click opens the tool in another tab.
Overview
A template defines how to process the data being retrieved from Data Source queries and other data expressions. It also defines formulas, formatting options, and other analysis and presentation options. The overall execution flow for an analysis, including the optional prompt component, is shown below

Using the Template Designer
A template can be created to consume the deeply nested portfolio objects from the data source. Running the template about to be described presents the prompt.

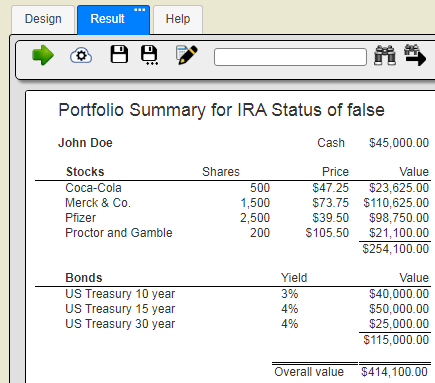
Sample results are shown below.
The template’s main properties of interest are shown below.

. . .

. . .

A template can reference a prompt content in a similar manner as a data source. The data source referenced above already references the prompt component.
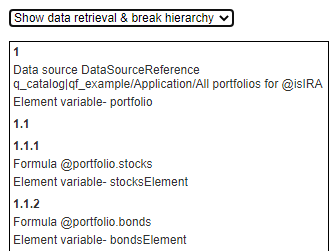
Data retrieval approach can be seen on the right hand side by clicking an area without a cell and choosing the option noted. Groups 1.1.1 and 1.1.2 each extract embedded arrays by name from the main retrieval’s portfolio variable. They also set element variables for use in formulas.
The 1.1 group has 2 inner groups. One group iterates through the stocks and the other iterates through the bonds. The cell layout is depicted below.
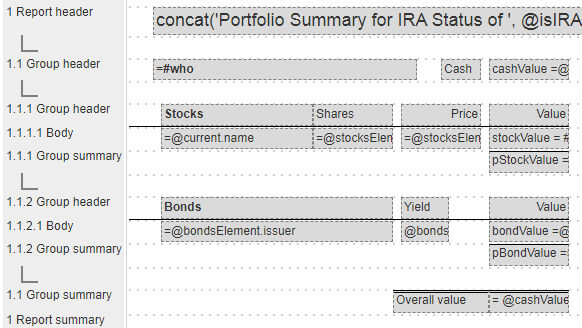
The 1.1 group header cells are.

The 1.1.1 group iterates through the portfolio’s stocks. The group’s properties have

. . .

Here we chose to set the variable named stocksElement to the active element of the stocks list as it is iterated through. The ‘@current’ variable is always set. Below we reference the various variable fields using dot path notation.
The 1.1.1.1 body cells are.
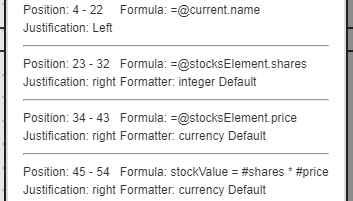
The last cell uses the ‘#’ field shortcut notation.
The 1.1.1 group summary cell is

The 1.1.2 group iterates through the portfolio’s bonds. The group’s properties have

. . .

The pattern is similar to the one in the stock’s group. The 1.1.2.1 body cells are.
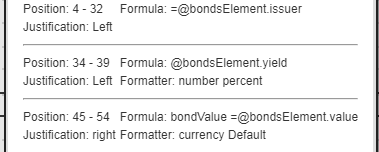
The 1.1.2 group summary cell is

Notice the use of the “sum()” macro to accumulate the bond values.
The 1.1 group summary contains

Here we reference the various variables to compute the overall portfolio value.
Below is an example of output from a more elaborate template using custom cells and other formatting features.
To save the template click
In the catalog prompt navigate to the target folder.
Name the template “Portfolios for @isIRABoolean”.
Click the OK button.
The template is now saved in the shared catalog.
Next Steps
Accessing Your Database
To configure access to your MongoDB database see the guides at
http://doc.qarbine.com/docs/category/data-service-configuration
Querying Your Database
For database specific interaction guides navigate to
http://doc.qarbine.com/docs/category/data-source-designer